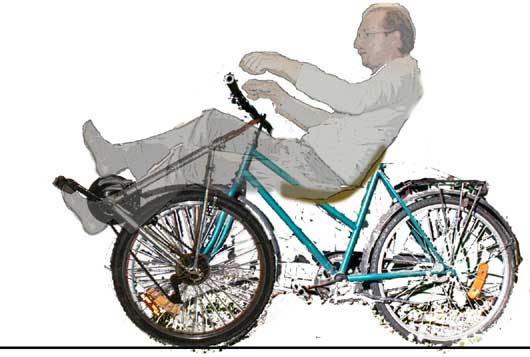
Build your own recumbent bike, the camel bike, part 1.
materials:
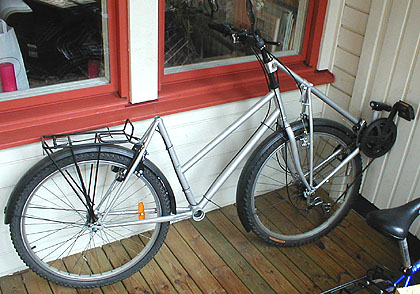
1 female mtb so you sit deeper in the frame
1 back-end of a male/female mtb with same wheel-diameter
1 strip of metal big enough to drill 2 holes in 9 cm apart
1 corner strip of metal
1 piece of wood ca. 20 x 30 x 2 cm. to sit on, quality wood
1 piece of wood ca. 20 x 60 x 2 cm. for back support, quality wood
a few strips of metal to attach the wood to the tubes
some wood-screws
maybe some new gear and brake cables, specially need longer outer-cables.
tools:
screwdrivers, bah-co, measuring tape.
5 kg hammer
angle grinder (quickest) or metal-saw and file
electric saw (quick) or handsaw
glue clamp
something strong that extends 20 cm above the floor (explain later)
workbench or something strong at such height (explain later)
i guess a cloth for the dirty hands
OK.
lets first do things where you don`t cut anything yet.
pull the seat-pin and the seat out the female mtb frame.
get the front wheel-shield off the front-wheel.
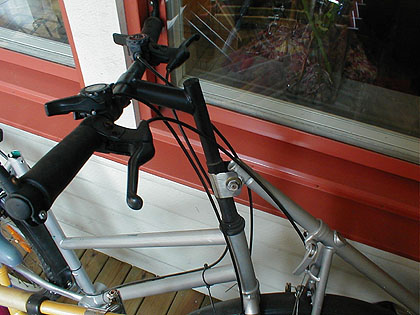
take the steer with the longest steering-pin and attach it front-side back in the female mtb frame at the highest possible position. the longer the steering-pin the less chance of your legs hitting the steer while cycling. my legs are long so i do experience that, and have to get a longer steering-pin.
construct the seat in the female mtb frame.
first saw a latch out the back of the seat and round off the front.
the rounding off is done by holding the saw at an angle, watch the fingers!
attach the seat from underneath with a strip of metal.
now attach the corner metal for the back support.
now attach the back-support to the corner metal and the saddle support with a strip of metal.
the back-support specially should not break, you don`t want the saddle support in your spine.
try to sit on it and see if it fits.
there is still a way back to 2 bikes. make decision to go on or not.
OK, you decide to go on.
The bending of the front fork.
the distance between the front-fork is normally about 11 cm.
the back-wheel needs about 14 cm so we have to widen it.
the track of the front-fork is about 5 cm,
that is the distance between the axle line of the front-fork and the front axle.
(the fork is bent slightly forward)
this is a factor in the stability of riding a bike.
also because of the added mountain-bike on top of the front fork, you need extra stability.
so bend the front-fork a few centimeters to the back for added riding stability.
, i first tried it with about 35 mm track, and became nearly unridable at normal speeds, 20kmphr. than bent it back to about 60 mm, this was OK, 90 mm even better and at 120 it feels comfortable, you don`t have to correct all the time.
i noticed that you do need to be alert at all times and look forward. if you don`t you deviate from you coarse.
this bike makes about 4 meter turns or even less if you concentrate and plan the turn.
so its quite agile.
what i found out with my bicycle is that by lowering the front tire pressure
you will get a considerable more comfy ride.
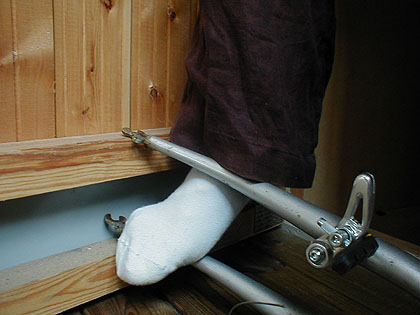
get the front-wheel out, and lay the mtb on its side
use something strong that extends 20 cm above the floor to lay the top leg of the front-fork on, and stand or jump on the lower arm to widen it from 11 to 14 cm.
now pick the bike up and lay it on to the workbench with the front-fork
take the heavy hammer and pond it on top of each fork to get it slightly more bent to the front. (i didn`t do this as yet with my experiment)
Now for the destructive part on to the other bike.
take the saddle out with pin.
take the wires loose from the back brake and gears.
get rid of the back-wheel protection and maybe the baggage holder.
take the angle grinder to cut the frame, some distance from the sadle pin bar.
you need 2 cuts, the top bar and bottom bar.
be ware of the possible cable-holders for the gears, you might need them on the back-frame, so cut before them. you end up with a cut up mtb.
now loosen the bolts on the back-wheel,
and use the glue-clamp to temporarily hold the wheel in place,
because it has the annoying tendency to fall out during work.
place the rear end of the mtb in the corner against the wall in about the desired angle.
see if the female mtb front-fork fits on the rear end of the mtb standing there.
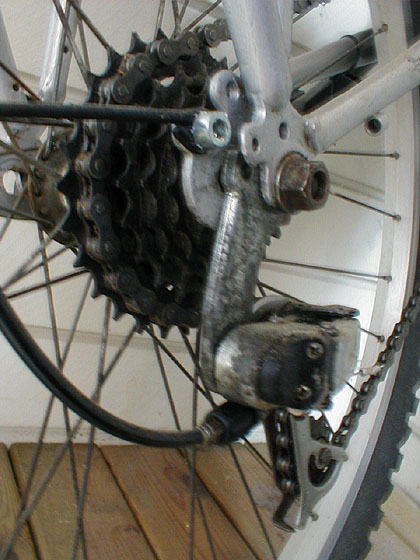
usually the rear-end axle bracket needs some grinding to fit the front-fork,
as there is an extra screws for the derailleur that could be in the way,
and some rings for the attachment of the baggage holder.
you may also have to adjust the front-fork brackets a bit with the grinder.
now fit in the front-fork and semi tighten the axle bolts.
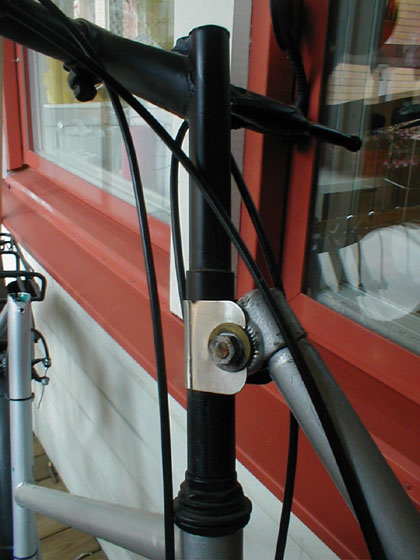
remove the longest seat-pin from one of the saddles and put it in the saddle pin tube of the front drive. don`t put the saddle-pin deep in the frame because generally its hard to get it out.
together with the saddle clamp you will attach this to the steering pin of the female mtb.
this is where the strip with the 2 holes round 6 mm comes in handy.
bend the strip around the steering-pin and use the bolt from the saddle to attach it to the saddle pin.
My steering-pin was so short i had to extend the pipe if the front fork.
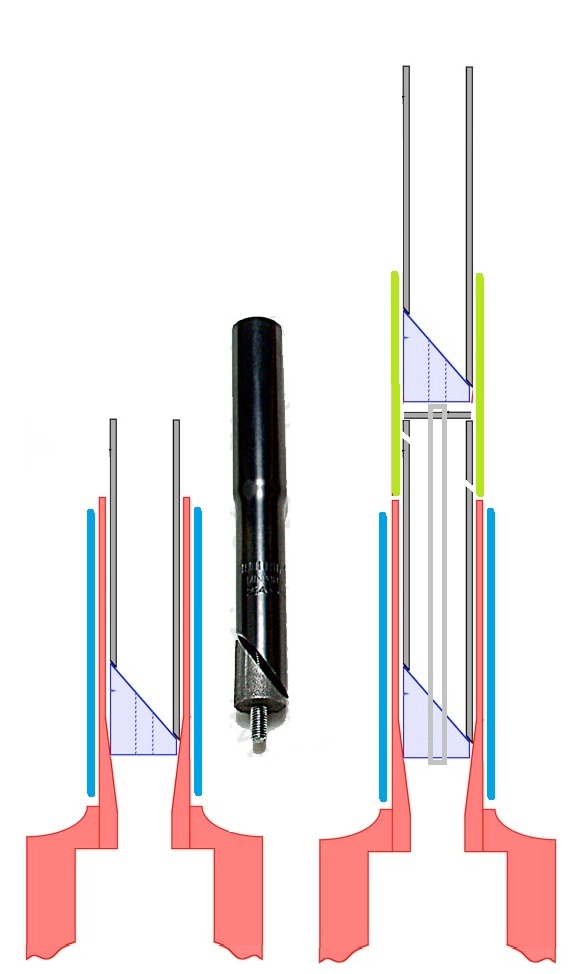
now it turns out you can buy the part as well, search on stem riser or stem extention.
in the picture, the black pipe is the stem extention you can buy. under here how you do it yourself.
i cut off the pipe of the other bicycles front-fork, and reused the clamping system of the other bikes steering-pin. so what you actually do is cut off the steering-pin, cut it to an angle, so it clamps both on the downside and upside, put it in the front-fork pipe, put the cut off pipe on top, and tighten. now you have extended the front-fork.
now remove the glue-clamp from the front-wheel, loosen the axle-bolts a bit and adjust the front-wheel in its settings so that it can run freely.
make sure the front-fork deeply fits on to the front axle.
firmly tighten the front axle bolts and the saddle pin bolts.
then its time to put the front-brakes in place, and the back wheel-brakes if you have any.
you can also put the gear-cables in place. the thing here is that you probably need longer outer-cables, but you can also put a few short ones behind each other, not so nice but works.
OK, roll out and test it.
wash your hands and put your trousers in your socks to prevent them getting dirty.
later on you might want to redo the front-wheel protection.
also you could take out the back-wheel, chain and pedals and replace it with a the matching front-wheel. saves you some weight.
practise some on quiet roads.
the more tense you are trying, the less you will succeed.
relax, and try a slight downhill road to coast a bit first to get the feel.
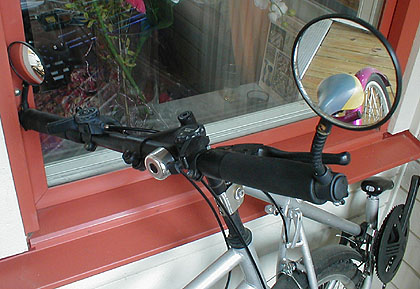
the steer is mostly there to put your hands on, not to steer,
this will more confuse riding than help it.
get some mirrors, looking back is a no-no because of your neck position and keeping balance.
by the way, i never ever fell off it!
2012-06-24